


Available Now
How to Clean Exterior Walls Before Painting?
Leo Donovan • Nov 11, 2023
To clean exterior walls before painting, gather tools, assess the wall material, clear the area, apply cleaning solution, scrub, rinse, address stubborn issues, dry, and inspect for painting readiness. Proper cleaning ensures a successful paint job.
· Proper Cleaning is Paramount: Cleaning before painting is essential for paint adhesion and durability.
· Assess Your Surface: Choose the right cleaning method for your wall material to prevent damage.
· Combat Contaminants: Thorough cleaning removes algae, moss, and dirt, ensuring a loner-lasting finish.
· Cleaning Solutions Matter: Specialized cleaners or DIY solutions are effective for stubborn stains.
· Extend Paint Lifespan: Cleaning extends the life of your paint job, saving you time and money.
Introduction
When it comes to painting the exterior of your home, proper preparation is key to achieving a stunning and long-lasting finish. One of the most critical steps in this process is cleaning your exterior walls thoroughly before applying any paint. In this comprehensive guide, I will walk you through the entire process, from gathering the necessary tools and materials to choosing the right cleaning solutions and techniques for various wall surfaces.
Importance of Properly Cleaning Exterior Walls
Before diving into the details, let's take a moment to understand why cleaning your exterior walls is so crucial. Properly cleaned walls provide a clean and smooth canvas for your paint, ensuring that it adheres well and looks flawless. Here are some key benefits:
· Enhanced Durability: Cleaning removes dirt, grime, and contaminants that can weaken the paint's bond with the surface. This results in a more durable paint job that can withstand the elements. For those looking to take their exterior painting to the next level, Perfect Painters in Ballarat offer expert services tailored to your needs.
· Improved Aesthetics: Clean walls allow paint colors to appear true and vibrant. You'll achieve a more beautiful and professional-looking finish. If you're considering a full exterior makeover, understanding the intricacies of exterior painting in Ballarat, VIC can be invaluable.
· Preventing Paint Failure: Failure to clean your walls can lead to peeling, cracking, and premature paint failure. Save yourself the hassle of repainting by doing it right the first time. A detailed guide on how to prepare exterior window sills for painting can provide additional insights.
Now, let's get started with the step-by-step process of cleaning your exterior walls before painting.
Section 1: Tools and Materials

Essential Tools for Cleaning Exterior Walls
Before you begin, gather the necessary tools and materials. One of the most overlooked aspects of this process is ensuring the wood is primed correctly. For those working with wooden exteriors, understanding how to prime exterior wood for painting is crucial.
· Pressure Washer: A pressure washer is a powerful tool for removing dirt, grime, and loose paint. You can rent one from a local home improvement store if you don't own one.
· Bristle Brush: A sturdy bristle brush will help you scrub away stubborn stains and areas that the pressure washer can't reach.
· Cleaning Solution: Invest in a good quality cleaning solution specifically designed for exterior walls or make your own by mixing water, dish soap, and a touch of bleach.
· Safety Gear: Safety should be a priority. Wear goggles to protect your eyes from splashing water and gloves to shield your hands.
Selecting the Right Cleaning Solutions
Choosing the right cleaning solution is crucial. Depending on the extent of dirt and stains on your walls, you may opt for a commercial cleaner or a DIY solution. Here's a simple DIY recipe:
· Ingredients:
o 1 gallon of water
o 1/3 cup of trisodium phosphate (TSP)
o 1/2 cup of liquid dish soap
o A small amount of bleach (for mold and mildew)
· Mixing:
o Fill a bucket with the gallon of water.
o Add the TSP and stir until it dissolves.
o Mix in the liquid dish soap.
o If you're dealing with mold and mildew, add a small amount of bleach, but be cautious and wear protective gear.
Safety Precautions for Handling Chemical Cleaners
If you opt for chemical cleaners like TSP, it's essential to take safety precautions:
· Ventilation: Ensure proper ventilation in the work area to disperse any fumes.
· Protective Gear: Wear safety goggles and gloves when handling chemicals.
Now that you have your tools and cleaning solutions ready, it's time to prepare the work area.
Section 2: Preparing the Work Area
Removing Furniture and Obstacles
Start by clearing the area around the walls. Remove any outdoor furniture, potted plants, or obstacles that might hinder your access to the walls. This step ensures a safe and efficient cleaning process.
Covering Plants and Sensitive Areas
If you have plants or sensitive areas near the walls, cover them with plastic tarps or drop cloths to protect them from the cleaning solution and water.
Ensuring Adequate Ventilation
As mentioned earlier, ensure proper ventilation in the work area, especially if you are using chemical cleaners. Open windows and doors to allow fresh air to circulate, reducing the concentration of fumes.
With the work area prepared, let's move on to the steps for cleaning your exterior walls.
Section 3: Steps to Clean Exterior Walls
| Contaminants | Description | Impact on Paint |
|---|---|---|
| Dirt and Dust | Accumulation affects paint adhesion and aesthetics | Can lead to uneven finish |
| Algae and Moss | Compromise paint adhesion, can cause peeling | Damages paint over time |
| Cobwebs and Debris | Obscure the surface, affect paint application | Create an uneven paint finish |
| Mildew and Mold | Undermine paint adhesion, cause paint to deteriorate | Lead to peeling, flaking, and fading |
Step 1: Clearing Loose Debris and Cobwebs
Before applying any cleaning solution, start by removing loose debris, cobwebs, and dirt from the walls. You can use a broom or a soft brush for this.
Step 2: Mixing and Applying Cleaning Solutions
Next, mix your chosen cleaning solution as discussed earlier. Then, using a sprayer or a bucket and a brush, apply the solution evenly to the wall's surface. Start from the bottom and work your way up to prevent streaks.
Step 3: Scrubbing and Agitating the Surface
After applying the cleaning solution, use a bristle brush to scrub the surface gently. Pay extra attention to areas with stubborn stains or mold. The brush will help agitate and dislodge dirt and contaminants.
Step 4: Rinsing and Removing Residue
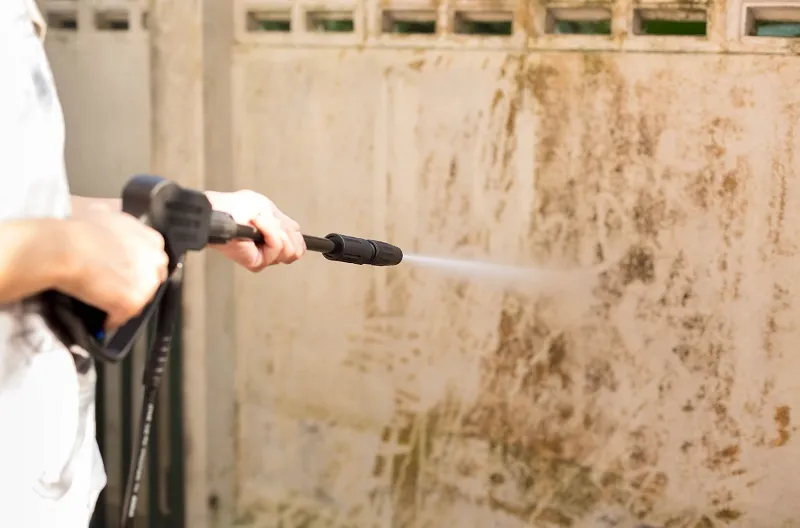
Now, it's time to rinse off the cleaning solution and loosened dirt. Use a pressure washer on a low setting to prevent damage to the wall surface. Start at the top and work your way down, ensuring thorough rinsing. Be cautious not to hold the pressure washer nozzle too close to the wall, as it can damage the surface.
Section 4: Special Considerations
Dealing with Stubborn Stains and Mold
If you encounter stubborn stains or mold that won't come off with regular cleaning, you may need to use a more potent solution. Mix a stronger cleaning solution with a higher concentration of bleach and repeat the scrubbing and rinsing process. For those who want to ensure a pristine surface before painting, understanding the steps for
prepping for exterior painting can be invaluable.
Preparing Different Wall Surfaces (Brick, Stucco, Wood, etc.)
| Wall Surface | Suitable Cleaning Methods |
|---|---|
| Brick | Lower pressure washing, brushing |
| Stucco | Soft-bristle brush, lower pressure washing |
| Wood | Hand scrubbing, gentle spray, no high-pressure washing |
| Other Materials | Varies, consider material-specific guidelines |
Different wall surfaces may require different cleaning techniques. For instance:
· Brick: Be gentle when cleaning brick to avoid damaging the mortar. Use a lower pressure setting on the pressure washer.
· Stucco: Stucco is delicate, so use a soft-bristle brush and lower pressure when pressure washing.
· Wood: Avoid high-pressure washing on wood surfaces, as it can cause damage. Use a garden hose with a gentle spray or opt for hand scrubbing.
Addressing Peeling or Loose Paint
If you have areas with peeling or loose paint, it's essential to remove it before painting. You can use a paint scraper or a wire brush to get rid of loose paint. Sand the area smooth and then proceed with cleaning.
Section 5: Alternative Methods
Pressure Washing Exterior Walls
Pressure washing is one of the most efficient methods for cleaning exterior walls, as it can quickly remove dirt and loose paint. However, it should be used with caution, as high pressure can damage some surfaces. Always start with a lower pressure setting and gradually increase if needed.
💡 Pressure washing isn't always the best option: While pressure washing is commonly used to clean exterior walls, it's not suitable for all surfaces. In fact, using high-pressure water on delicate materials like older bricks or wood siding can cause damage. It's essential to assess your wall's condition and choose the appropriate cleaning method.
When to Use Trisodium Phosphate (TSP)
TSP is a powerful cleaner commonly used for pre-painting preparation. It's especially effective for removing heavy stains, grease, and mildew. Use TSP when you're dealing with tough contaminants that regular cleaning solutions can't handle.
Pros and Cons of Chemical Cleaners
Chemical cleaners like TSP have their advantages and disadvantages.
Pros:
· Effective at removing tough stains and mold: Chemical cleaners can tackle stubborn stains and mold growth.
· Time-saving for extensive cleaning jobs: They can save time and effort on large surfaces.
· Can be diluted to adjust the strength: You can control the concentration of the cleaning solution for different cleaning needs.
Cons:
· Requires careful handling and protective gear: Due to potential health hazards, chemical cleaners should be handled with care.
· Can be harsh on the environment if not disposed of properly: Proper disposal is essential to minimize environmental impact.
Section 6: Post-Cleaning Steps

Drying the Walls Thoroughly
After cleaning, it's essential to allow the walls to dry completely before proceeding with painting. Depending on the weather, this can take a day or two. Proper drying ensures that the paint adheres well and doesn't trap moisture underneath.
Water alone isn't always enough: While water is an essential part of cleaning, it may not be sufficient to remove stubborn stains or grime. Using a specialized exterior wall cleaner or a mixture of water and mild detergent can be more effective, especially when dealing with grease or oil stains.
Evaluating the Surface for Paint Readiness
Before you start painting, inspect the cleaned walls for any remaining dirt, stains, or areas that may need further attention. Ensure that the surface is smooth and free of contaminants.
Repairing Any Damaged Areas
If you discover any damaged areas during the cleaning process, such as cracks or holes, take the time to repair them before painting. Use appropriate fillers and patching materials to ensure a smooth and uniform surface.
Section 7: Professional Help vs. DIY
Hiring a Professional Exterior Cleaner
If you're not comfortable with pressure washing or handling chemicals, or if your walls require extensive cleaning, consider hiring a professional exterior cleaner. They have the experience and equipment to ensure a thorough and safe cleaning process.
DIY Cleaning for Budget-Conscious Homeowners
For those on a budget or who enjoy taking on DIY projects, cleaning exterior walls can be a satisfying and cost-effective task. Just be sure to follow safety guidelines and take your time to achieve the best results.
Section 8: Conclusion

The Importance of Clean Exterior Walls in Painting
In conclusion, cleaning your exterior walls before painting is an essential step that should not be overlooked. It sets the foundation for a successful and long-lasting paint job. By following the steps outlined in this guide and choosing the right tools and materials, you'll be well-prepared to transform your home with a fresh, vibrant coat of paint.
Algae and moss can affect your paint job: Neglecting to clean exterior walls thoroughly can lead to the growth of algae, moss, or lichen. These organisms can compromise the paint's adhesion and even cause it to peel over time. Proper cleaning removes these contaminants, ensuring a more durable and attractive paint finish.
Proper cleaning can extend the lifespan of your paint: One surprising benefit of thorough exterior wall cleaning is that it can significantly extend the lifespan of your paint job. By removing dirt, contaminants, and potential mold or mildew, you create a clean and smooth surface for the paint to adhere to, ensuring its longevity.
Timing matters: Cleaning your exterior walls at the right time can make a difference. It's generally recommended to clean them on a cloudy day or when the surface is shaded. Cleaning in direct sunlight can cause the cleaning solution to dry too quickly, potentially leaving streaks or residue behind.
Ready to Start Your Painting Project
Now that you have the knowledge and insights on how to clean exterior walls before painting, you're ready to embark on your painting project with confidence. Take your time, follow the steps diligently, and enjoy the satisfaction of a beautifully painted home.
Additional Resources and References
In crafting this comprehensive guide on "How to Clean Exterior Walls Before Painting," I drew from trusted sources, expert advice, and industry knowledge to ensure you have the most accurate and reliable information at your fingertips.
https://build.com.au/how-clean-exterior-walls#:~:text=Garden
FAQs
What is the best thing to wash exterior walls with?
The best cleaning solution for washing exterior walls is a mixture of water, liquid dish soap, and a small amount of trisodium phosphate (TSP) for tough stains. This solution effectively removes dirt and contaminants while being safe for most surfaces.
How do professional painters clean walls before painting?
Professional painters typically clean walls before painting by using a combination of pressure washing, scrubbing with appropriate brushes, and applying cleaning solutions. They may also use trisodium phosphate (TSP) for stubborn stains and mold.
What is the easiest way to wash walls before painting?
The easiest way to wash walls before painting is to use a pressure washer with a low-pressure setting, combined with a suitable cleaning solution. This method efficiently removes dirt and loose paint, saving you time and effort.
What to do before painting exterior walls?
Before painting exterior walls, you should:
· Clean the walls thoroughly to remove dirt and contaminants.
· Repair any damaged areas, cracks, or holes.
· Allow the walls to dry completely.
· Evaluate the surface for a smooth and clean finish.
· Apply primer if necessary before painting.
How long to wait to paint after washing exterior?
After washing the exterior walls, you should wait at least 24 to 48 hours to ensure that the walls are completely dry before applying paint. Proper drying time is crucial to achieve a successful paint job.
GET IN TOUCH
Need more information? Speak to one of our experts and get personalised advice on your project to bring your vision to life. Contact us today to schedule your consultation or request a free consultation.
Contact Us

Unveiling artistic wonders, "Innovative Painting Techniques for Concrete Surfaces" explores creative methods like stenciling, acid staining, and glow-in-the-dark paint. Discover how these techniques transform dull concrete into vibrant canvases, making art accessible and exciting for everyone.Diverse Techniques, Endless Possibilities: Explore decorative stenciling, acid staining, glow-in-the-dark paint, and metallic epoxy coatings for a varied and dynamic range of artistic expression. · Practical Applications Beyond Aesthetics: Innovative painting techniques aren't just about looks. They enhance safety, functionality, and durability in various settings. · Maintenance Matters: Preserve the beauty of painted concrete with regular cleaning, proper sealants, and prompt repairs, ensuring longevity and vibrancy. · DIY vs. Professional Services: Consider factors like budget, time commitment, and complexity when deciding between a DIY project and hiring professionals for concrete painting endeavors. · Concrete as a Canvas: Celebrate the transformation of concrete into a legitimate medium for art. Discover how visionary artists and designers are reshaping public spaces with concrete masterpieces. Introduction The world of artistic expression has found a new canvas – concrete surfaces. In recent times, the popularity of innovative painting techniques for concrete has soared, transforming once mundane structures into captivating works of art. As someone deeply immersed in the world of creative exploration, I am thrilled to take you on a journey through the transformative power of painting on concrete. For further inspiration and professional insights, explore the offerings of https://townsvilleconcretingcompany.com.au/ .

Discover the wonders of eco-friendly paints and concrete for home projects. They improve air quality, save money in the long run, offer vibrant colors, empower DIY adventures, and bring real-world benefits like reduced allergies and energy efficiency. · Improved Indoor Air Quality: Opting for eco-friendly paints reduces volatile organic compounds (VOCs), promoting healthier indoor air and minimizing respiratory issues. · Cost-Effective Sustainability: Despite initial costs, eco-friendly paints and concrete offer long-term savings through durability and energy-efficient properties. · Diverse Aesthetic Choices: Contrary to misconceptions, eco-friendly paints boast vibrant, long-lasting colors, ensuring aesthetic satisfaction without compromising sustainability. · DIY Opportunities: Embrace sustainable home improvement with DIY projects using eco-friendly paints and concrete, contributing to both personal satisfaction and environmental well-being. · Real-World Impact: Explore success stories where families experienced tangible benefits, from reduced allergies to lower energy bills, showcasing the real-world positive impact of eco-friendly choices.

To estimate the cost of painting a house's outside, measure the area, pick the right paint, factor in labor, and account for any extra work needed. Consider hiring pros for quality. · Accurate cost estimation for exterior house painting is crucial for effective budgeting and project planning. · Factors such as surface area, type, prep work, paint quality, labor, and additional features significantly impact the overall cost . · Cost ranges vary widely, with small to medium-sized homes averaging $2,000 to $5,000. · Utilize online calculators, painting software, and industry guides for precise cost estimation. · While DIY painting can save money , professional painters offer expertise , efficiency, and guaranteed quality. When it comes to transforming the look of your home, few things have the impact of a fresh coat of paint. Whether you're planning to give your house a facelift or you're getting it ready to sell, estimating the cost of exterior house painting accurately is of utmost importance. It helps you budget effectively, avoid unexpected expenses, and ensures that your project proceeds smoothly. In this guide, we will dive deep into the world of exterior house painting cost estimation. We will explore the various factors that can influence the cost, provide you with average cost ranges, and take you through a step-by-step process to estimate the expenses involved. Additionally, we will share valuable resources, tips for cost-saving, and insights into the advantages of hiring professional painters. So, let's get started on your journey to understanding the art of estimating exterior house painting costs.
GET IN TOUCH
Need more information? Speak to one of our experts and get personalised advice on your project to bring your vision to life. Whether you're considering a fresh coat of paint or specialized concrete installations, our team is here to help. For expert concrete services, check out our trusted partners at Concrete Contractors. Contact us today to schedule your consultation or request a free quote
Contact Us
Painters Ballarat, VIC
Professional Local House Painters Near Me
Perfect Painters in Ballarat are professional and local Ballarat painters. We've been operating for over 10 years with the best painters in the area.
Our team is only made up of the most highly qualified and skilled painters to ensure you always get the results you're looking for.
Need a new coat of paint? Reach us at (03) 4828 1320. Our Ballarat Painters are ready for you!
Quick & Reliable
We can be contacted anytime via email or telephone
Location
131 Scott Parade, Ballarat East VIC 3350
info@perfectpaintersinballarat.com.au
Call
Ballarat's #1 professional House painting Service providers since 2010.
This is a referral website, please visit our Privacy Policy for more information. Find us online.
Navigation
Services
Working hours
- Mon - Fri
- -
- Sat - Sun
- Closed
Give us a call and if we cannot get to you straight away, one of our specialist will call you back shortly.
New Paragraph